


Physical-computing is a concept which envisions new interactions between people and computers in our everyday environment. It was first proposed by by Dan O’Sullivan of New York University[1]. This concept is expected to make possible interactions which are beyond the limitations of current computer systems. For example, by measuring the movements of players, Kinect for Xbox360 changed the way people play games and experience entertaiment.
But there are some large difficulties faced when trying to design a physical-computing interface. Developing a device based on the concept of physical computing is an undertaking comparable to recreating the input-output system of a current personal computer. To such facilitate innovation cross-sector collaboration is a must. However, if designers and engineers cannot understand each others' field, it is very difficult to communicate complex ideas.
In order to address this difficulty, a device which can connect designers and engineers, and serve as a translator for their ideas is needed.
Some examples of such a device are “Gainer”, “Funnel” and “Arduino”, which have been developed as toolkits for a physical computing using a PC.
These toolkits are a small-size computer designed to be extension equipment for modern computer input and output systems. They are also designed to be easy to understand for designers who are not engineers. On the bounty of highly-modularized input and output systems, these toolkits are widely favoured among artists, designers and engineers as a tool for realising their physical computing ideas.
However, in recent years, it seems that the meaning of "computer in our lives is shifting from desktops and notebooks to smartphones and tablets. With that in mind, we developed Konashi as a physical computing toolkit tailored for smartphones and tablets. Anybody can take advantage of Konashi by using our open-source library "konashi-ios-sdk" and development environment for smartphone and tablet apps.
(※1) Tom I. and Dan O., Physical Computing: Sensing and Controlling the Physical World with Computers, Thomson, (May, 2004).
| Series Name | Model | OS |
|---|---|---|
| iPhone | iPhone 4S, iPhone 5, iPhone 5S, iPhone 5C, iPhone 6, iPhone 6 Plus,iPhone 7,iPhone 8 | iOS7.1 〜 |
| iPad | iPad Air, iPad mini, iPad(4th Generation/ November 2012 Model), iPad(3rd Generation /March 2012 Model) |
iOS7.1 〜 |
| iPod touch | iPod touch(5th Generation) Please note: Not compatible with 4th generation iPod touch |
iOS7.1 〜 |

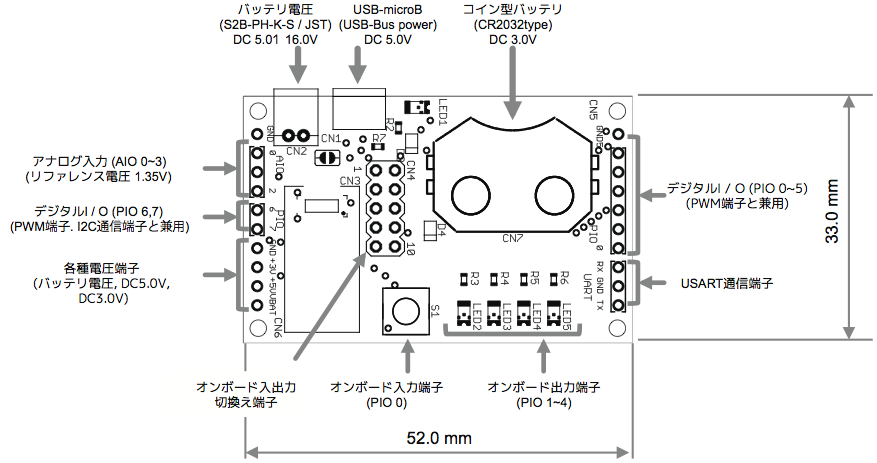

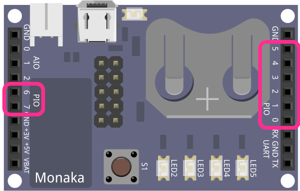
konashi is equipped with 8 digital I/O pins. With digital I/O pins, it is possible to input and output in two states, high and low.
In konashi’s case, the standard voltage for the digital I/O is 3 volts, so it can input and output in either 3 or 0 volts.
Furthermore, in their initial state all of the digital I/O are set to input.
If the digital I/O pins are set to input, it is also possible to configure the internal pull-up resistors with pinMode, pinModeAll functions.
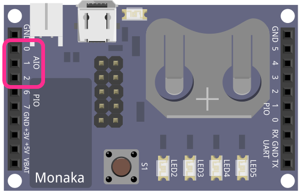
Konashi is equipped with 3 analog I/O pins. With analog I/O, voltage is inputted as microvolts, and it is possible to output a specified voltage (DAC).
The base voltage of konashi’s analog I/O is 1.3 volts, so it can input and output in microvolts from 0 to 1.3 volts.
Furthermore, the initial state of the analog I/O is ADC (input).
Please be aware that ADC and DAC cannot be used at the same time.
Also, for DAC, only one pin can be used at a time. If you set other pins to DAC, another pin will be reset to input.
PWM(Pulse Width Modulation) is a system style which controls the ON time (duty cycle) of a pin, and generates pulses by turning it ON and OFF. This is a commonly-used method to control motor rotation speed or LED light strength.
On konashi, it is possible to set all of the digital I/O (PIO) pins to PWM mode.
When using PWM on konashi, in addition to the modes pwmMode, pwmPeriod, pwmDuty , which decide the duty cycle or period with a function, there is a mode which can easily specify the brightness of an LED from 0 to 100% (using the function pwmLedDrive). Which mode to use can be specified with the function pwmMode.
Because konashi's pulse width modulation is packaged with pwm software, if the duty cycle is modified multiple times in a short interval, konashi's ble systems will process each change consecutively, so it may not always output the specified duty cycle accurately.
Therefore, please try not to access konashi with ble consecutively, or if the duty cycle does get out of sync, please target and control something which will not be damaged.
Also, the lowest PWM cycle rate it is possible to set is 1000 [us].
In order to enable serial communication with other devices, konashi is compatible with I2C and UART.
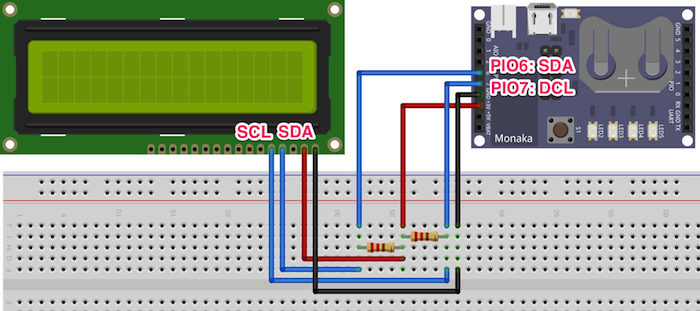
The signal types used with I2C Serial Data (SDA) and Serial Clock (SDL) only.
This signal standard was developed as a simple bus system used for controlling electronics, and the standard’s specifics can be found on the company NPX Semiconductor’s website. (Please refer below for references.)
Reference: I2C Bus Specification Documents Version 2.1 (NPX Semiconductors) (PDF File/780KB)
konashi operates as an I2C master, and carries out communication with connected (slave) peripherals.
The two signal waves SDA and SDL are compatible with POI6(SDA) and POI7(SCL), respectively. They are connected as outlined in the above diagram, and programmed according to a device’s signal protocol, so can communicate with LCDs and sensors which are compatible with I2C.
Please note, be sure to use pull-up resistors with SDA and SDL.
By using the I2C functions in konashi’s library, it is possible to efficiently program I2C communication.
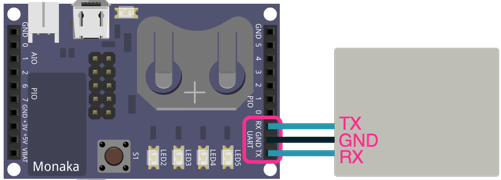
UART is a general term for a function which carries out serial communication through a start-stop synchronisation system, and by making use of this it is possible to carry out serial communication with konashi, conforming to RS-232(ANSI/TIA/EIA-232-F-1997).
Konashi uses two signal waves; one for sending data (TX) and one for receiving data (RX), and carries out serial communication with UART. It is connected as shown in the above diagram, and with UART it is possible to easily communicate with PCs and other peripherals.
The voltage of the signal is 3V.
To see which signal speeds it is possible to set, please look at Constants / UART.
Bluetooth Low Energy (here referred to as BLE), is a low-energy consumption version of Bluetooth as decided by Bluetooth SIG, and it is equipped in iPhones, iPads, and the latest MacBooks.
Konashi uses BLE to communicate with iPhones and iPads.
As konashi is designed to be simple for first-time users, the CPU does not often enter sleep mode and such, thus it is not designed for low energy consumption. Please note that it uses more energy than most BLE devices.
Following is an outline of the UUIDs for konashi’s service and characteristics.
| Name | UUID | |
|---|---|---|
| KONASHI_SERVICE_UUID | 0xFF00 |
| Name | UUID | |
|---|---|---|
| KONASHI_PIO_SETTING_UUID | 0x3000 | |
| KONASHI_PIO_PULLUP_UUID | 0x3001 | |
| KONASHI_PIO_OUTPUT_UUID | 0x3002 | |
| KONASHI_PIO_INPUT_NOTIFICATION_UUID | 0x3003 |
| Name | UUID | |
|---|---|---|
| KONASHI_PWM_CONFIG_UUID | 0x3004 | |
| KONASHI_PWM_PARAM_UUID | 0x3005 | |
| KONASHI_PWM_DUTY_UUID | 0x3006 |
| Name | UUID | |
|---|---|---|
| KONASHI_ANALOG_DRIVE_UUID | 0x3007 | |
| KONASHI_ANALOG_READ0_UUID | 0x3008 | |
| KONASHI_ANALOG_READ1_UUID | 0x3009 | |
| KONASHI_ANALOG_READ2_UUID | 0x300A |
| Name | UUID | |
|---|---|---|
| KONASHI_I2C_CONFIG_UUID | 0x300B | |
| KONASHI_I2C_START_STOP_UUID | 0x300C | |
| KONASHI_I2C_WRITE_UUID | 0x300D | |
| KONASHI_I2C_READ_PARAM_UIUD | 0x300E | |
| KONASHI_I2C_READ_UUID | 0x300F |
| Name | UUID | |
|---|---|---|
| KONASHI_UART_CONFIG_UUID | 0x3010 | |
| KONASHI_UART_BAUDRATE_UUID | 0x3011 | |
| KONASHI_UART_TX_UUID | 0x3012 | |
| KONASHI_UART_RX_NOTIFICATION_UUID | 0x3013 |
| Name | UUID | |
|---|---|---|
| KONASHI_HARDWARE_RESET_UUID | 0x3014 | |
| KONASHI_HARDWARE_LOW_BAT_NOTIFICATION_UUID | 0x3015 |
| PIO0 | 0 | PIO pin 0 |
| PIO1 | 1 | PIO pin 1 |
| PIO2 | 2 | PIO pin 2 |
| PIO3 | 3 | PIO pin 3 |
| PIO4 | 4 | PIO pin 4 |
| PIO5 | 5 | PIO pin 5 |
| PIO6 | 6 | PIO pin 6 |
| PIO7 | 7 | PIO pin 7 |
| S1 | 0 | Tact switch (When the jumper is short-circuited, connected to PIO0) |
| LED2 | 1 | Red LED (When the jumper is short-circuited, connected to PIO1) |
| LED3 | 2 | Red LED (When the jumper is short-circuited, connected to PIO2) |
| LED4 | 3 | Red LED (When the jumper is short-circuited, connected to PIO3) |
| LED5 | 4 | Red LED (When the jumper is short-circuited, connected to PIO4) |
| AIO0 | 0 | AIO pin 0 |
| AIO1 | 1 | AIO pin 1 |
| AIO2 | 2 | AIO pin 2 |
| I2C_SDA | 6 | I2C SDA pin(PIO pin 6) |
| I2C_SCL | 7 | I2C SCL pin(PIO pin 7) |
| HIGH | 1 | Changes the pin’s output to HIGH(3V) |
| LOW | 0 | Changes the pin’s output to LOW(0V) |
| TRUE | 1 | Changes the pin’s output to HIGH(3V) (Same as the above “HIGH”) |
| FALSE | 0 | Changes the pin’s output to LOW(0V) (Same as the above “LOW) |
| OUTPUT | 1 | Sets the pin’s input/output to output |
| INPUT | 0 | Set the pin’s input/output to input |
| PULLUP | 1 | Set the pin’s pull-up setting to ON |
| NO_PULLS | 0 | Set the pin’s pull-up setting to OFF |
| KONASHI_ANALOG_REFERENCE | 1300 | Reference voltage for analog input and output 1300mV |
| KONASHI_PWM_DISABLE | 0 | Do not use the specified PIO as PWM (Use as digital I/O) |
| KONASHI_PWM_ENABLE | 1 | Use the specified PIO as PWM |
| KONASHI_PWM_ENABLE_LED_MODE | 2 | Use the specified PIO as a PWM in LED mode |
| KONASHI_PWM_LED_PERIOD | 10000 | When in LED mode the PWM cycle is 10ms |
| KonashiUartModeDisable | 0 | UART Disabled |
| KonashiUartModeEnable | 1 | UART Enabled |
| KonashiUartBaudrateRate2K4 | 0x000a | 2400bps |
| KonashiUartBaudrateRate9K6 | 0x0028 | 9600bps |
| KonashiUartBaudrateRate19K2 | 0x0050 | 19200bps |
| KonashiUartBaudrateRate38K4 | 0x00a0 | 38400pbs |
| KonashiUartBaudrateRate57K6 | 0x00f0 | 57600pbs |
| KonashiUartBaudrateRate76K8 | 0x0140 | 76800pbs |
| KonashiUartBaudrateRate115K2 | 0x01e0 | 115200pbs |
| KONASHI_I2C_DATA_MAX_LENGTH | 19 | The largest amount of bytes I2C can receive at one time |
| KONASHI_I2C_DISABLE | 0 | Disable I2C |
| KONASHI_I2C_ENABLE | 1 | Enable I2Cを有効にする(Default mode: 100kbps) |
| KONASHI_I2C_ENABLE_100K | 1 | Enable I2C in 100kbps mode |
| KONASHI_I2C_ENABLE_400K | 2 | Enable I2C in 400kbps mode |
| KONASHI_I2C_STOP_CONDITION | 0 | Stop Condition |
| KONASHI_I2C_START_CONDITION | 1 | Start Condition |
| KONASHI_I2C_RESTART_CONDITION | 2 | Restart Condition |
| KONASHI_SUCCESS | 0 | When successful |
| KONASHI_FAILURE | 1 | When failure |
| KONASHI_EVENT_CONNECTED | When konashi is connected (The connection has not finished) |
| KONASHI_EVENT_READY | When the connection with konashi is finished |
| KONASHI_EVENT_UPDATE_PIO_INPUT | When PIO’s input status has changed |
| KONASHI_EVENT_UPDATE_ANALOG_VALUE | When the voltage for one of the AIO pins is acquired |
| KONASHI_EVENT_UPDATE_ANALOG_VALUE_AIO0 | When the voltage for AIO0 is acquired |
| KONASHI_EVENT_UPDATE_ANALOG_VALUE_AIO1 | When the voltage for AIO1 is acquired |
| KONASHI_EVENT_UPDATE_ANALOG_VALUE_AIO2 | When the voltage for AIO2 is acquired |
| KONASHI_EVENT_I2C_READ_COMPLETE | When data is received from I2C |
| KONASHI_EVENT_UART_RX_COMPLETE | When data is recieved from UART’s Rx |
| KONASHI_EVENT_UPDATE_BATTERY_LEVEL | When konashi’s battery level is acquired |
| KONASHI_EVENT_UPDATE_SIGNAL_STRENGTH | When konashi’s signal strength is acquired |
Initialising konashi.
Before using konashi, be sure to initialize viewDidLoad, and anything else which appears first on ViewController.
[Konashi initialize];
None
If successful: KONASHISUCCESS (0), If a failure: KONASHIFAILURE (-1)
Find a konashi near to your iPhone
After executing this function, a list of konashi around your phone will appear. If you click on one of them, you will connect to it automatically. After that, the events KONASHI_EVENT_CONNECTED and KONASHI_EVENT_READY will launch, so please arrange to catch these events on addObserver beforehand.
[Konashi find];
None
If successful: KONASHISUCCESS (0), If a failure: KONASHIFAILURE (-1)
Disconnect konashi.
Notice: In operating systems older than iOS6.1, there is a bug in the Core Bluetooth API, so this function will not work properly. Please use iOS6.1 or later.
[Konashi disconnect];
None
If successful: KONASHISUCCESS (0), If unsuccessful: KONASHIFAILURE (-1)
Return if the iOS device is connected to konashi.
When the event KONASHI_EVENT_CONNECTED launches it becomes TRUE. Before that it is FALSE.
[Konashi isConnected];
None
BOOL
You can catch events related to konashi.
Because konashi and the iPhone are connected by BLE, konashi’s status and the status of pins are acquired asynchronously.
For example, to acquire the voltage of an AIO pin, send a request to konashi with analogReadRequest, and after receiving the aquisition complete event KONASHI_EVENT_UPDATE_ANALOG_VALUE , it becomes possible to reference the AIO pin’s voltage.
To see what kind of events there are please reference Constants / Events.
[Konashi addObserver:(id)notificationObserver selector:(SEL)notificationSelector name:(NSString*)notificationName];
| notificationObserver | id | Specify the observer |
| selector | SEL | Specify a function to call an event launch |
| name | NSString* | Specify an event name. For details, please reference Constants - Events |
If successful: KONASHI_SUCCESS (0), If unsuccessful: KONASHI_FAILURE (-1)
- (void)viewDidLoad
{
    [super viewDidLoad];

    [Konashi initialize];
    [Konashi addObserver:self selector:@selector(konashiConnected) name:KONASHI_EVENT_CONNECTED];
}

- (void) konashiConnected
{
    NSLog(@"CONNECTED");
}
Cancel konashi event observation carried out byaddObserver.
[Konashi removeObserver:(id)notificationObserver];
| notificationObserver | id | Specify the observer |
If successful: KONASHI_SUCCESS (0), If unsuccessful: KONASHI_FAILURE (-1)
- (void)viewDidLoad
{
    [super viewDidLoad];

    [Konashi initialize];
    [Konashi addObserver:self selector:@selector(konashiConnected) name:KONASHI_EVENT_CONNECTED];
}

- (void) konashiConnected
{
    NSLog(@"CONNECTED");
   [Konashi removeObserver:self];
}
Specify whether to use a PIO pin as input or output. For details please look at Core functions / Digital.
[Konashi pinMode:(int)pin mode:(int)mode];
| pin | int | Specified PIO pin name. To see what pin names are possible please look at Constants / Pin name. |
| mode | int | Specified mode for that pin. You can specify whether it is INPUT or OUTPUT. For details please look at Constants / PIO. |
If successful: KONASHI_SUCCESS, If unsuccessful: KONASHI_FAILURE
Set LED2 as OUTPUT
[Konashi pinMode:LED2 mode:OUTPUT];
Please specify whether to use the PIO pin for input or output. For details please see Core functions / Digital.
[Konashi pinModeAll:(int)mode];
| mode | int | The settings of all 8 pins from PIO0 to PIO7. Please specify from 0x00 to 0xFF, with 1 as OUTPUT, and 0 as INPUT. |
If successful: KONASHI_SUCCESS, If unsuccessful: KONASHI_FAILURE
Set all PIO pins as OUTPUT
[Konashi pinModeAll:0xFF];
Specify whether to set pull-up for PIO pins.
In their initial state, no pull-up is applied to the PIO pins(NO_PULLS). Please look at Core Functions / Digital for details.
[Konashi pinPullup:(int)pin mode:(int)mode];
| pin | int | The name of a specified PIO pin. Please see Constants / Pin name for possible pin names. |
| mode | int | Specify whether to set pull-up for the pin. PULLUP or NO_PULLS can be specified. For details, please look at Constants / PIO. |
If successful: KONASHI_SUCCESS, If unsuccessful: KONASHI_FAILURE
Set pull-up for PIO7
[Konashi pinMode:PIO7 mode:PULLUP];
Specify whether to implement a pull-up resistor for PIO pins. For details, please see Core Functions / Digital.
[Konashi pinPullupAll:(int)mode];
| pin | int | Name of the specified PIO pin. For possible names please see Constants / Pin name. |
| mode | int | Settings for the pull-up resistors of all pins from PIO0 through to PIO7. Please specify from 0x00 to 0xFF. |
If successful: KONASHI_SUCCESS, If unsuccessful: KONASHI_FAILURE
Set pull-up for All PIO pins
[Konashi pinPullupAll:0xFF];
Acquire the input condition of a specific PIO pin.
Before acquiring the input condition of a pin, be sure to set the pin’s mode to input with pinMode, pinModeAll . If the pin is in output mode the correct input condition cannot be acquired.
For details, please see Core functions / Digital.
[Konashi digitalRead:(int)pin];
| pin | int | Name of the PIO pin. For possible names, please looks at Constants / Pin name. |
HIGH or LOW
Acquire the input condition of S1
[Konashi digitalRead:S1];
Acquire the conditions of all PIO pins. For details, please see Core functions / Digital.
[Konashi digitalReadAll];
None.
Input information for the 8 PIO pins (0x00 to 0xFF)
Acquire the input condition for all of the PIO pins.
[Konashi digitalReadAll];
Set the output condition for a specific PIO pin.
For details please see Core functions / Digital.
[Konashi digitalWrite:(int)pin value:(int)value];
| pin | int | Name of the PIO pin. For possible pin names please see Constants / Pin name. |
| value | int | The output condition for theassigned PIO. HIGH or LOW can be specified. For details please see Constants / PIO. |
If successful: KONASHI_SUCCESS, If unsuccessful: KONASHI_FAILURE
Set LED2 to HIGH
[Konashi digitalWrite:LED2 value:HIGH];
Set the output conditions for a specific PIO pin. For details, please look at Core functions / Digital.
[Konashi digitalWriteAll:(int)value];
| value | int | A value set from output PIO0 to PIO7. It is posible to set it between 0x00 and 0xFF. |
If successful: KONASHI_SUCCESS, If unsuccessful: KONASHI_FAILURE
Set all of the PIO pin on HIGH.
[Konashi digitalWriteAll:0xFF];
Return the analog output to the base voltage
[Konashi analogReference];
None
KONASHI_ANALOG_REFERENCE, return to 1300(mV)。
Send a request to konashi to acquire the voltage of a specified AIO pin.
This is a function to send a request to konashi, so to acquire the value practically then after checking the voltage acquisition completion event, defined in KONASHI_EVENT_UPDATE_ANALOG_VALUE or Constants / Events, in addObserver, acquire the value with analogRead.
For features related to analog functions, please see Core functions / Analog .
[Konashi analogReadRequest:(int)pin];
| pin | int | Name of an AIO pin. The possible pin names are AIO0, AIO1 and AIO2. For details please see Constants / Pin name. |
If successful: KONASHI_SUCCESS, If unsuccessful: KONASHI_FAILURE
Acquire the input voltage of AIO0.
- (void)viewDidLoad
{
    [super viewDidLoad];

    [Konashi initialize];

    [Konashi addObserver:self selector:@selector(konashiReady) name:KONASHI_EVENT_READY];
    [Konashi addObserver:self selector:@selector(readAio0) name:KONASHI_EVENT_UPDATE_ANALOG_VALUE_AIO0];
}

// Tap action for the search for konashi button
- (IBAction)findKonashi:(id)sender {
    [Konashi find];
}

// Tap action for button to acquire voltage for AIO0
- (IBAction)requestReadAio0:(id)sender {
    [Konashi analogReadRequest:AIO0];
}

- (void) readAio0
{
    NSLog(@"READ_AIO0: %d", [Konashi analogRead:AIO0]);
}
Acquire the voltage for a specified AIO pin. The value which can be acquired with this function is the voltage acquired with analogReadRequest previously.
If you would like to acquire the voltage of konashi’s AIO pins, first, send an acquisition request to konashi with analogReadRequest, then after checking the voltage acquisition complete event defined in KONASHIEVENTUPDATEANALOGVALUE or Constants / Events with addObserver, then you can obtain the value with this function.
For functions related to analog features, please see Core functions / Analog.
[Konashi analogRead:(int)pin];
| pin | int | Name of an AIO pin. The possible pin names are AIO0, AIO1 and AIO2. For details please see Constants / Pin name. |
A mV unit value from 0 to KONASHIANALOGREFERENCE will be returned.
Obtain input voltage for AIO0
- (void)viewDidLoad
{
    [super viewDidLoad];

    [Konashi initialize];

    [Konashi addObserver:self selector:@selector(konashiReady) name:KONASHI_EVENT_READY];
    [Konashi addObserver:self selector:@selector(readAio0) name:KONASHI_EVENT_UPDATE_ANALOG_VALUE_AIO0];
}

// Tap action for search for konashi button
- (IBAction)findKonashi:(id)sender {
    [Konashi find];
}

// Tap action for button to obtain voltage for AIO0
- (IBAction)requestReadAio0:(id)sender {
    [Konashi analogReadRequest:AIO0];
}

- (void) readAio0
{
    NSLog(@"READ_AIO0: %d", [Konashi analogRead:AIO0]);
}
Output an unspecified voltage with a specified AIO pin.
The highest voltage which can be set is KONASHIANALOGREFERENCE.
For analogue features, please see Core functions / Analog.
[Konashi analogWrite:(int)pin milliVolt:(int)milliVolt];
| pin | int | Name of an AIO pin. The possible names are AIO0, AIO1, and AIO2. For details please see Constants / Pin name. |
| milliVolt | int | Set the specified voltage in mV. It is possible to set it from 0 to `KONASHI_ANALOG_REFERENCE` |
If successful: KONASHI_SUCCESS, If unsuccessful: KONASHI_FAILURE
Make AIO output 1.0V
[Konashi analogWrite:AIO0 milliVolt:1000];
Set whether to use a specified PIO pin as PWM
Any PIO pin can be set to PWM mode.
When assigning KONASHI_PWM_ENABLE mode, please specify the cycle and ON period with pwmPeriod and pwmDuty beforehand.
For details on PWM, please see Core functions / PWM.
[Konashi pwmMode:(int)pin mode:(int)mode];
| pin | int | The name of the pin set to PWM mode. It is possible to set from `PIO0` to `PIO7` |
| mode | int | The set PWM mode. It is possible to specify KONASHI_PWM_DISABLE , KONASHI_PWM_ENABLE, or KONASHI_PWM_ENABLE_LED_MODE. For details please see Constants / PWM. |
If successful: KONASHI_SUCCESS, If unsuccessful: KONASHI_FAILURE
Set PWM with the LED cycle set to 10ms, and duty cycle to 5ms
[Konashi pwmMode:LED2 mode:KONASHI_PWM_ENABLE];
[Konashi pwmPeriod:LED2 period:10000];
[Konashi pwmDuty:LED2 duty:5000];
Set the PWM cycle of a specified pin.
Please specify the cycle units as microseconds (us).
For details on PWM please see Core functions / PWM.
[Konashi pwmPeriod:(int)pin period:(unsigned int)period];
| pin | int | Name of a PIO pin. `PIO0` to `PIO7` can be set. |
| period | unsigned int | Please specify the units as microseconds (us) in 32 bits. The largest possible is 232us = 71.5 minutes. |
If successful: KONASHI_SUCCESS, If unsuccessful: KONASHI_FAILURE
Set LED2’s period to 10ms
[Konashi pwmPeriod:LED2 period:10000];
Set the duty cycle of a specified pin (when on).
Please specify the units in microseconds (us).
For details on PWM please see Core functions / PWM.
[Konashi pwmDuty:(int)pin duty:(unsigned int)duty];
| pin | int | Name of a PIO pin. `PIO0` to `PIO7` can be set. |
| duty | unsigned int | Duty cycle. Please specify the units as microseconds (us) in 32bits. The largest possible is 232us, 71.5 minutes. |
If successful: KONASHI_SUCCESS, If unsuccessful: KONASHI_FAILURE
Set the duty cycle for LED2 to 5ms
[Konashi pwmDuty:LED2 duty:5000];
Set the brightness of the LED of a specified pin from 0 to 100%
When using the function pwmLedDrive, please specify KONASHIPWMENABLELEDMODE with pwmMode.
For details on PWM please see Core functions / PWM.
[Konashi pwmLedDrive:(int)pin dutyRatio:(int)ratio];
| pin | int | Name of a PIO pin. It is possible to set from `PIO0` to `PIO7`. |
| ratio | int | Brightness of the LED. Please set from 0 to 100. |
If successful: KONASHI_SUCCESS, If unsuccessful: KONASHI_FAILURE
Set the brightness of LED2 to 30%
[Konashi pwmMode:LED2 mode:KONASHI_PWM_ENABLE_LED_MODE];
[Konashi pwmLedDrive:LED2 dutyRatio:30];
Enable or disable UART.
Before enabling, please set the Baud Rate with uartBaudrate.
For details on UART, please see Core functions / Communication - UART.
[Konashi uartMode:(int)mode];
| mode | int | The set UART mode. KONASHI_UART_DISABLE or KONASHI_UART_ENABLE can be set.ß |
If successful: KONASHI_SUCCESS, If unsuccessful: KONASHI_FAILURE
Enable UART
[Konashi uartMode:KONASHI_UART_ENABLE];
Send one byte of data with UART.
For details on UART, please see Core functions / Communication - UART.
[Konashi uartWrite:(unsigned char)data];
| data | unsigned char | The data that will be sent. 1 byte. |
If successful: KONASHI_SUCCESS, If unsuccessful: KONASHI_FAILURE
Send the character ‘A’ with UART
[Konashi uartWrite:'A'];
Enable or Disable I2C.
Communication speed of I2C can be set to 100kbps or 400kbps, which is specified with mode argument.
For details on I2C please see Core functions / Communication - I2C.
[Konashi i2cMode:(int)mode];
| mode | int | Set mode for I2C. KONASHI_I2C_DISABLE , KONASHI_I2C_ENABLE, KONASHI_I2C_ENABLE_100K, or KONASHI_I2C_ENABLE_400K can be set. KONASHI_I2C_ENABLE and KONASHI_I2C_ENABLE_100K are equivalent |
If successful: KONASHI_SUCCESS, If unsuccessful: KONASHI_FAILURE
Enable 100kbps(Default) communication speed on I2C
[Konashi i2cMode:KONASHI_I2C_ENABLE];
Raise I2C’s start condition.
Please enable I2C with i2cMode beforehand.
For details on I2C, please see Core functions / Communication - I2C.
[Konashi i2cStartCondition];
None
If successful: KONASHI_SUCCESS, If unsuccessful: KONASHI_FAILURE
Raise I2C’s restart condition.
Please enable I2C with i2cMode beforehand.
For details on I2C, please see Core functions / Communication - I2C.
[Konashi i2cRestartCondition];
None
If successful: KONASHI_SUCCESS, If unsuccessful: KONASHI_FAILURE
Raise I2C’s stop condition.
Please enable I2C with i2cMode beforehand.
For details on I2C, please see Core functions / Communication - I2C.
[Konashi i2cStopCondition];
None
If successful: KONASHI_SUCCESS, If unsuccessful: KONASHI_FAILURE
Write data to a specified address with I2C.
Please enable I2C with i2cMode beforehand.
For details on I2C, please see Core functions / Communication - I2C.
[Konashi i2cWrite:(int)length data:(unsigned char*)data address:(unsigned char)address];
| length | int | Length of the data to be written (bytes). The longest possible, KONASHI_I2C_DATA_MAX_LENGTH is 19bytes. |
| data | unsigned char* | The date to be written |
| address | unsigned char | The address to be written to |
If successful: KONASHI_SUCCESS, If unsuccessful: KONASHI_FAILURE
Write the data ‘A’ to the address 0x45
unsigned char data[] = {'A'};
[Konashi i2cWrite:1 data:data address:0x45];
Make a request to read data from the address specified with I2C.
With this function, data cannot be obtain by only making a request. In order to gain the value, after checking KONASHI_EVENT_I2C_READ_COMPLETE with addObserver, obtain the value with i2cRead.
[Konashi i2cReadRequest:(int)length address:(unsigned char)address];
| length | int | Length of the data to be read. The max length, `KONASHI_I2C_DATA_MAX_LENGTH` (19) |
| address | unsigned char | Address to read the data from |
If successful: KONASHISUCCESS, If unsuccessful: KONASHIFAILURE
Konashi will obtain the data read by I2C. The value obtained with this function is of the time when previous i2cReadRequest was issued.
[Konashi i2cRead:(int)length data:(unsigned char*)data];
| length | int | The length of the data to be read. The longest possible, `KONASHI_I2C_DATA_MAX_LENGTH` (19) |
| data | unsigned char* | Memory pointer for the data read will be stored |
If successful: KONASHI_SUCCESS, If unsuccessful: KONASHI_FAILURE
Restart konashi.
If you restart konashi, the BLE connection will be automatically closed.
[Konashi reset];
None
If successful: KONASHI_SUCCESS, If unsuccessful: KONASHI_FAILURE
Restart konashi
[Konashi reset];
Send a request to konashi to obtain the remaining battery level.
This function sends a request to konashi, so in order to acquire the value, after checking KONASHIEVENTUPDATEBATTERYLEVEL (Battery level acquisition complete event) in addObserver, you can obtain the value with batteryLevelRead.
[Konashi batteryLevelReadRequest];
None
If successful: KONASHI_SUCCESS, If unsuccessful: KONASHI_FAILURE
Obtain konashi’s remaining battery level.
- (void)viewDidLoad
{
    [super viewDidLoad];

    [Konashi initialize];

    [Konashi addObserver:self selector:@selector(konashiReady) name:KONASHI_EVENT_READY];
    [Konashi addObserver:self selector:@selector(battery) KONASHI_EVENT_UPDATE_BATTERY_LEVEL];
}

// Tap function for button to search for konashi
- (IBAction)findKonashi:(id)sender {
    [Konashi find];
}

// Tap function for button to check battery level
- (IBAction)batteryLevelReadRequest:(id)sender {
    [Konashi batteryLevelReadRequest];
}

- (void) battery
{
    NSLog(@"READ_BATTERY: %d", [Konashi batteryLevelRead]);
}
konashi’s battery level will be obtained. The value which can be obtained with this function is the value obtained before with batteryLevelReadRequest.
If you wish to obtain konashi’s current battery level, first, send a request to konashi with batteryLevelReadRequest, and after checking KONASHIEVENTUPDATEBATTERYLEVEL with addObserver, you can obtain the value with this function.
[Konashi batteryLevelRead];
None
The remaining battery power level is returned as a percentage from 0 to 100.
Acquire remaining battery power.
- (void)viewDidLoad
{
    [super viewDidLoad];

    [Konashi initialize];

    [Konashi addObserver:self selector:@selector(konashiReady) name:KONASHI_EVENT_READY];
    [Konashi addObserver:self selector:@selector(battery) KONASHI_EVENT_UPDATE_BATTERY_LEVEL];
}

// Search for konashi button tap action
- (IBAction)findKonashi:(id)sender {
    [Konashi find];
}

// Acquire remaining battery power button tap action
- (IBAction)batteryLevelReadRequest:(id)sender {
    [Konashi batteryLevelReadRequest];
}

- (void) battery
{
    NSLog(@"READ_BATTERY: %d", [Konashi batteryLevelRead]);
}
Make a request to obtain konashi’s signal strength.
With this function, data cannot be obtained only by making a request. In order to obtain the value, after checking KONASHIEVENTUPDATESIGNALSTRENGTH (Signal strength accquisition complete event) with addObserver, the value can be obtained with signalStrengthRead.
[Konashi signalStrengthReadRequest];
None
If successful: KONASHI_SUCCESS, If unsuccessful: KONASHI_FAILURE
Obtain konashi’s signal strength
- (void)viewDidLoad
{
    [super viewDidLoad];

    [Konashi initialize];

    [Konashi addObserver:self selector:@selector(konashiReady) name:KONASHI_EVENT_READY];
    [Konashi addObserver:self selector:@selector(strength) KONASHI_EVENT_UPDATE_SIGNAL_STRENGTH];
}

// Search for konashi button tap action
- (IBAction)findKonashi:(id)sender {
    [Konashi find];
}

// Aquire signal strenght button tap action
- (IBAction)signalStrengthReadRequest:(id)sender {
    [Konashi signalStrengthReadRequest];
}

- (void) strength
{
    NSLog(@"READ_STRENGTH: %d", [Konashi signalStrengthRead]);
}
Obtain konashi’s signal strength. The value which can be obtained with this function is the strength (db) of the time when the previous signalStrengthReadRequest was issued.
If you wish to obtain konashi’s current signal strength, first, send a request to konashi with signalStrengthReadRequest, and after checking KONASHIEVENTUPDATESIGNALSTRENGTH in addObserver, the value can be obtained with this function.
[Konashi signalStrengthRead];
None
Return signal strength in db
Acquire konashi’s signal strength
- (void)viewDidLoad
{
    [super viewDidLoad];

    [Konashi initialize];

    [Konashi addObserver:self selector:@selector(konashiReady) name:KONASHI_EVENT_READY];
    [Konashi addObserver:self selector:@selector(strength) KONASHI_EVENT_UPDATE_SIGNAL_STRENGTH];
}

// Search for konashi button tap action
- (IBAction)findKonashi:(id)sender {
    [Konashi find];
}

// Acquire signal strength button tap action
- (IBAction)signalStrengthReadRequest:(id)sender {
    [Konashi signalStrengthReadRequest];
}

- (void) strength
{
    NSLog(@"READ_STRENGTH: %d", [Konashi signalStrengthRead]);
}